- Connecting to the Internet
The first step in reading your email is to be sure you are connected
to the Internet. Email can be read from any Internet Service Provider
(ISP) including dialup, DSL and cable modem providers.
After you are connected, proceed with Step 2 -
Setting up your email client.
- Setting up your email
client
Your email client (the program you use to read your email) will now
need to be told how to connect to your mail server at Regzilla. Some
email
clients allow users to maintain several different profiles so that
they can read mail for more than one account, but this is not the case
with all clients. Services like America Online will not allow you to
read email at Regzilla with their email client but that does
not prevent you from using another program to read your mail.
If you have a service like this, cannot create a new profile, or would
just like to use a different email client for your email,
proceed to Step 3 - Installing Microsoft Outlook
Express.
If you need help setting up Microsoft Outlook Express for reading
email, you should proceed to Step 4 -
Configuring Microsoft Outlook Express. The rest of the
instructions
in this step are for other email clients.
Create a new profile for Regzilla if your client supports this.
Your email client will ask you for your Email Address, Username and
Password. These you should already know so just fill them in.
It will also ask you for your Incoming (POP or IMAP) and Outgoing
(SMTP) Mail server. Your Mail server for Incoming
mail is the same as your web site (ie: www.mydomain.com if your
domain name is mydomain.com). If you have a choice between
using the
POP or IMAP protocols for your Incoming Mail server, chose IMAP. Over
dialup connections, IMAP is a superior protocol, and will allow you to
check your mail both at home and in the office.
The Outgoing (SMTP) Mail server you use is dependent on your ISP. See
Appendix A - Outgoing Mail Servers for
more
information.
Check your email to confirm that everything was configured properly.
If you are able to send and receive mail then you're done and you can
skip the rest of this document. Read on if you have problems.
- Installing Microsoft Outlook
Express
Microsoft Outlook Express is the recommended email because it is easy
to use and configure. The rest of this document describes how to go
about downloading it and setting it up to work with Regzilla's email
system. Any other email clients that support the IMAP and SMTP
protocols will work fine, though.
Start up your web browser and go to:
http://www.microsoft.com/windows/ie/downloads/recommended/ie55sp2/default.asp
This is the page for downloading and installing Internet Explorer 5.5
and Internet Tools. This will give you the latest copy of Microsoft's
Internet browser and Outlook Express. You can use Internet Explorer
to surf the web from any ISP, including America Online, but you can
continue to use your current browser if you prefer.
Read the instructions and then choose your language and click on the
"Go" button.
You will be prompted to either Run or Save a program called
ie5setup.exe. You'll want to run it eventually, but you can save it
first if you'd like. This program is about 505K in length and should
not take long to download.
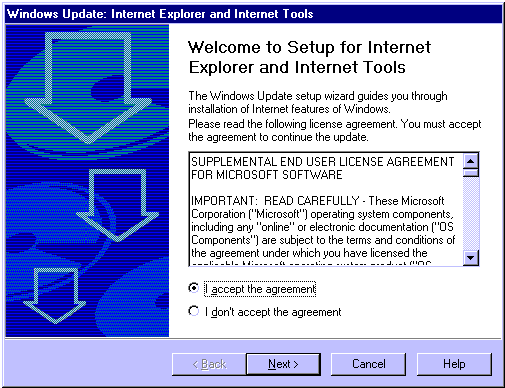
When you run ie5setup.exe you'll be prompted to read and accept the
licensing agreement as per Figure 1 below.

Figure 1
Check the "I accept the agreement" bullet and then click the "Next"
button.
Internet Explorer and Internet Tools Setup will then perform some
initializations and give you a prompt for two installations. One is
the Typical installation, and the other is the Minimal or Custom
installation. It is recommended to use the Typical installation, so
check "Install Now - Typical set of components" and click the "Next"
button.
Note: This will take a long time on a 28.8k modem.
You will now be prompted for a site to download from. For the most
part the default choice is sufficient, so just click the "Next" button
to begin the download.
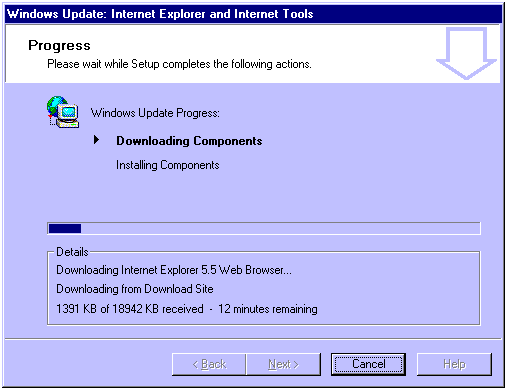
Setup will notify you of its progress as it downloads all the needed
components, and give you a time estimate of how much longer it expects
to take. See Figure 2 below.
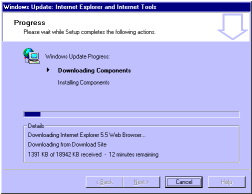
Figure 2
In the event of an interruption in the download process, simply rerun
the ie5setup.exe program and it will resume the download where it left
off. You will get an error message similar to Figure 3 if this
happens.
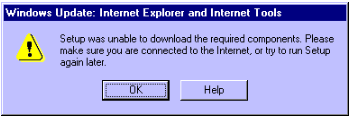
Figure 3
This is not an uncommon problem due to intermittent connectivity
problems on the Internet. You may have to resume several times, and
the download may have no progress for several minutes at a time. You
can hit the "Cancel" button to stop the download and resume it at a
later time if need be.
After all the components are downloaded, setup will begin to install
them, as per Figure 4.
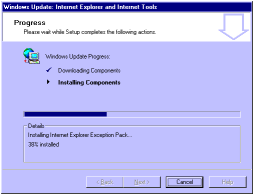
Figure 4
Once all the components have been installed, you will be prompted to
close all running applications and restart your computer to finish the
installation. Click the "Finish" button to restart your computer.
The reboot may take a few minutes, as Windows will be updating several
system components. Once the machine has booted up, proceed to
Step 4 - Configuring Microsoft Outlook
Express
below.
- Configuring Microsoft Outlook
Express
After installing Microsoft Outlook Express, there should be an icon on
your desktop similar to Figure 5. Double-click that icon to begin
setting up Outlook Express.

Figure 5
Outlook Express will start the Internet Connection Wizard and will ask
you about the Internet account to configure.
You should already have your Internet connection configured, so click
the
"Cancel" button. When it asks you if you're sure you want to cancel,
check off
the box that says "Do not run Internet Connection Wizard in the
future", and then click the "OK" button.
Outlook Express will now start, and prompt you for your name. This is
the name that will appear for you on your outgoing email. You should
use your full name. Enter your name and click the "Next" button.
Check the "I already have an e-mail address that I'd like to use"
button and enter your email address in the space provided. The window
will be similar to Figure 6. Click the "Next" button.
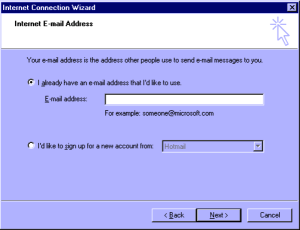
Figure 6
Next you will be prompted to enter your Incoming and Outgoing mail
servers. The Incoming mail server is the same as your web site
(ie: www.mydomain.com if your domain name is
mydomain.com).
Be sure to tell Outlook Express that your incoming mail server is an
"IMAP" server.
The Outgoing (SMTP) Mail server you choose is dependent on your ISP.
Outlook
Express supports the SMTP Auth protocol, so you can use
your web site for your Outgoing mail server as well.
Appendix A - Outgoing Mail Servers and
Appendix B - SMTP Auth for more
information.
If you use your web site as your Outgoing mail server, you will need
to continue on the Step 5 - Configuring Outlook
Express for SMTP Auth.
See Figure 7 for configuring your mail server names.

Figure 7
Click the "Next" button after you have entered your mail server
configuration.
The next window will configure your email account information. Enter
your Username in the "Account name" box. This may be different than
your email address. You can also give Outlook Express your email
password and allow it to remember the password for you so you don't
have to enter it each time you connect. Outlook Express defaults to
remembering your password. If you do not want it to save your
password information, be sure to uncheck the "Remember password" box.
Click the "Next" button when you are done entering your account
information.
Click the "Finish" button on the next window to save this
configuration.
The first time you run Outlook Express it might complain that it is
not the default mail reading client, click the "OK" box if it does.
Next you will be prompted for a list of folders to display. You will
need to be connected to the Internet for this to work. Click the
"Yes" button to begin configuring your folders.
You will be prompted for your username and password for your email
account if you did not choose to have Outlook Express save it. If so,
enter your password and click the "OK" button.
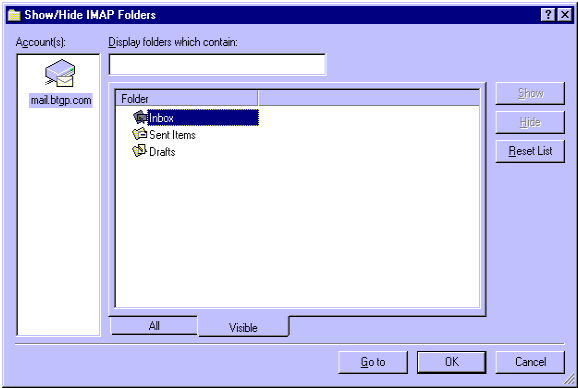
Outlook Express will show you a list of folders similar to Figure 8.
If you are unsure as to what folders you need, accept the default ones
by clicking the "OK" button. Otherwise select those that you want to
use and then click the "OK" button.

Figure 8
If this is your first time configuring IMAP Folders on Regzilla it is
likely your "Sent Items" and "Drafts" folders will appear as
sub-folders
of your Inbox.
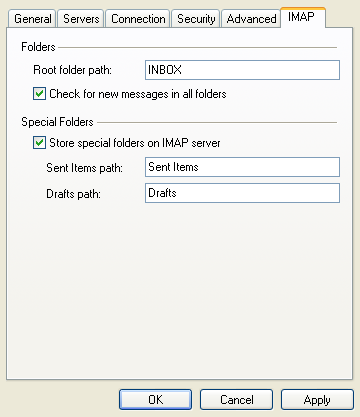
Click on Tools in the file menu, and then select
Accounts.... This will open a window listing your newly
configured email account. Highlight your Regzilla account and then
click the "Properties" button. Click on the "IMAP" tab in the
window that appears.
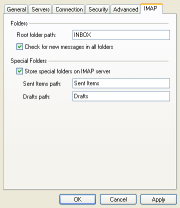
Figure 9
Make sure that your Root Folder Path is set to "INBOX" as in Figure 9,
then click the "OK" button and then the "Close" button on the Internet
Accounts window. Your "Sent Items" and "Drafts" folders should no
longer
be children of your Inbox.
In the main Outlook Express window there is a list of Folders on the
left
side. Click on the www.mydomain.com folder to see your total
read and unread email counts in your Inbox, Sent Items and Drafts. If
this is a new configuration you might not have any email yet,
otherwise you will probably have some saved in your Inbox.
Test that everything is working properly by sending an email to
yourself.
Outlook Express will put a line through any email that you delete, but
it does not actually go away. To get rid of deleted email
permanently, click on the "Purge" icon on the tool bar.
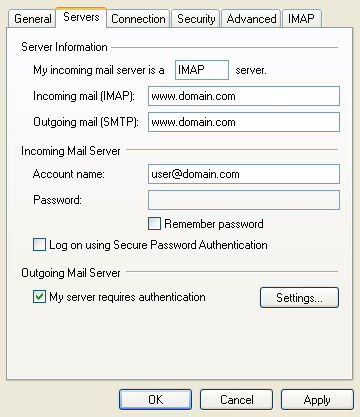
- Configuring Outlook Express
for SMTP Auth
If your ISP does not provide an Outgoing (SMTP) Mail Server, you can
configure Outlook Express to use your web site for this purpose.
Click on Tools in the file menu, and then select
Accounts.... This will open a window listing your newly
configured email account. Highlight your Regzilla account and then
click the "Properties" button. Click on the "Servers" tab in the
window that appears.
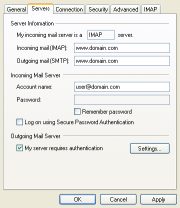
Figure 10
Check off the box that says "My server requires authentication" as in
Figure 10 and then click the "OK" button. Click the "Close" button in
the Internet Accounts window and then send a test mail to ensure that
everything is working properly.